Show Wrated Stitch Baby Hat by Mama Instruction
by Jean Leinhauser
Once you lot've learned the basic crochet stitches, you'll want to showtime your first pattern. (If you demand assistance with learning basic crochet stitches, visit www.LearnToCrochet.com.) There are hundreds of cute designs available for you to make, but for a beginner, they may look scary because they are written in what looks about like a foreign language.
That's because crochet patterns are written using many abbreviations and terms, which save space and make patterns easier to read. So the first matter yous need to practise is become familiar with the abbreviations and terms.
Some of them are piece of cake to understand, similar these that represent basic stitches:
| Bones Stitch Abbreviations | |
|---|---|
| Ch | Chain |
| Sl st | slip run up |
| Sc | single crochet |
| Hdc | half double crochet |
| Dc | double crochet |
| Tr (or trc) | triple (or treble) crochet |
Impress these out and mount them on a carte du jour to keep handy while you work.
| Terms represent things you are to do, like these: | |
|---|---|
| Inc | increase (Add one or more stitches.) |
| Dec | decrease (Eliminate one or more stitches.) |
| Turn | Plow your piece of work and so you tin work back for the next row. |
| Join | Join 2 stitches together; usually done by working a sideslip run up in the top of the next stitch. |
| Rep | repeat (Do it again.) |
| A complete list of crochet abbreviations and terms and their significant can be constitute at: world wide web.YarnStandards.com. | |
Getting Started
With the abbreviations terms at hand, let's look at a typical blueprint. A blueprint may be worked in rows (that is, back and forth to class a apartment slice such as an afghan) or in rounds (worked around to course a tube with no seams, such every bit a chapeau).
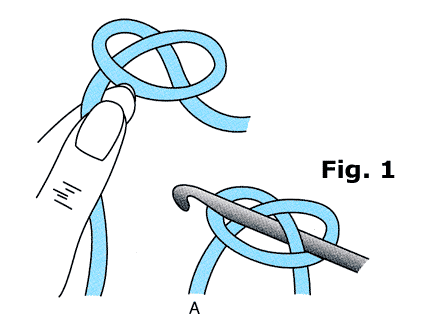
Whatsoever way the pattern is to be worked, the very first thing yous must do is make a slip knot on your hook. Does the pattern tell you lot this? No — it merely assumes you know that!
Here is how to make a slip knot (See Figure 1 & ii). And then with the slip knot at present on your hook, you volition make a foundation chain of a specified length, which the pattern will state. The number of chains you need may exist stated before the beginning row, or in the offset row, depending on the pattern author. Here are two examples:

Row one: Ch xv; sc in 2nd ch from claw and in each ch across.
or
Ch 15.
Row ane: Sc in 2nd ch from hook and in each ch across.
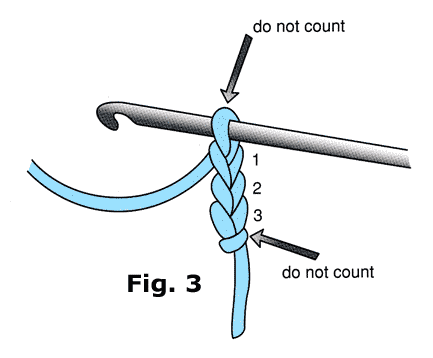
These both mean the same thing: Make a skid knot on your claw (recall that the patterns never tell you to do that), then make xv concatenation stitches and exist sure to make them loosely. Count these bondage very advisedly, and do not count the sideslip knot as a stitch. The loop on the hook is never counted as a stitch. (Run across Figure 3)
Now you lot have fifteen bondage and the pattern says to "sc in 2d ch from hook and in each
ch across". That means that yous await at your concatenation, count the first concatenation abroad from the hook, which you will skip, then work a single crochet in the 2nd chain away from the hook.
Why do you need to skip the outset chain? Well, try to piece of work a single crochet in information technology and you'll find out! Now work the unmarried crochet in the 2d ch from the claw, and in each of the remaining (abbreviated rem) 13 bondage. You have now completed Row 1. Count your stitches carefully, but do not count the loop (abbreviated lp) on the claw, or the slip knot, which is at present at the end of the row. You should have xiv unmarried crochet stitches.
Hint: Count the stitches at the terminate of every row. Well-nigh patterns tell y'all how many stitches you should take, and there are several ways of doing this.
: fourteen sc.
(14 sc).
—14 sc.
These are all ways to show the number of stitches you should have. Don't confuse this with an pedagogy to exercise something.
Remember that first chain yous skipped at the start of the row? When working in single crochet, you never work in that chain. Information technology is gone forever!
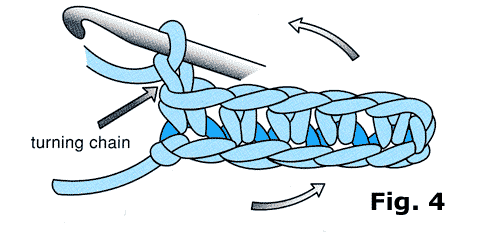
At present you lot accept worked Row i. Look at your pattern: at the end of the row it may say ch 1, turn." That means it is time to plough the work then you lot can make some other row of stitches. You lot need to piece of work the chain one to get your yarn high enough to begin the next row. Here is how to turn the work: (run into Effigy 4). We show turning the work to the right, merely you tin plow it to the left if y'all adopt. Just be sure to turn it the aforementioned way each time yous turn.
Hint: Always leave the hook in your work as you plough.
Now you are ready to start Row ii.
Merely some patterns don't tell yous to ch one, turn, at the finish of the row. They put that in the instructions for the next row,
Then the design could be written in 2 dissimilar ways:
Row 1: Sc in 2nd ch from hook and in each rem ch; ch one, turn.
Row two: Sc in each sc across.
or
Row 1: Sc in 2d ch from hook and in each rem ch.
Row two: Ch one, turn; sc in each sc beyond.
It really doesn't matter whether yous work the ch ane, turn, at the end of the first row, or at the kickoff of the next row. Merely do information technology the style the pattern tells you to.
When working Row three and all post-obit rows in unmarried crochet, never count the turning ch-i every bit a stitch. It just disappears, like the skipped stitch when you worked the foundation concatenation.
Return to tiptop
Working in Double Crochet
Skipped chains and turning chains don't disappear when working in double crochet or taller stitches. Now they count as a stitch.
Let'south do a first row in double crochet.
The pattern says: Ch 17.
Row 1: Dc in fourth ch from hook and in chain across: fifteen dc.
So you lot will make a slip knot on the hook, and then brand 17 chain stitches.
Now count iv chains away from the claw, and piece of work a double crochet into that chain, skipping the first 3 bondage. So work a double crochet in each of the remaining 13 chains. You now have 15 double crochet stitches.
How can that be when yous have only worked fourteen double crochets? Remember those first 3 chains yous skipped when y'all worked the first double crochet into the 4th chain from the hook? Those 3 skipped chains count equally first double crochet of the row, and on following rows you volition work into the superlative chain of those three bondage merely as though they were a regular dc sew.
At the terminate of this row, or the beginning of the next, the pattern will tell you how many chain stitches yous need to enhance the yarn to the meridian of the stitches for the next row. For single crochet, that was one ch, and that chain did not count every bit a sew together.
Merely for double crochet, a taller stitch, y'all need to make iii bondage then turn.And this time the 3 chains count as a stitch. And then on the next row, y'all presume that the chain iii counts equally the first dc, and you will work into the next stitch, not the first stitch (See Figure 5 ).
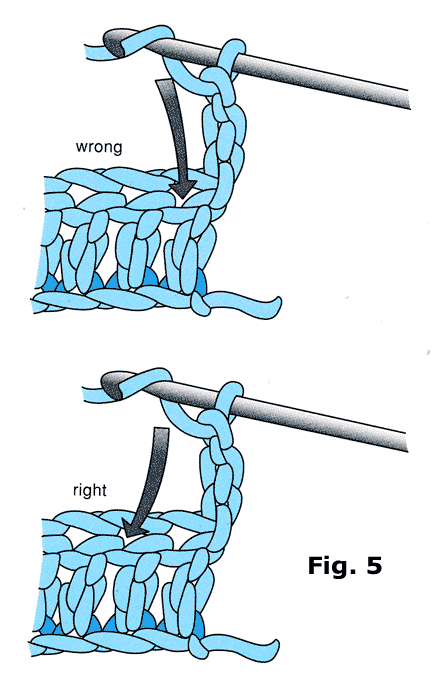
Unless your design tells y'all otherwise, on all stitches taller than a single crochet, the turning chain is counted as the first stitch of the row.
Render to meridian
Parentheses, Asterisks, and Brackets
In addition to using lots of abbreviations and terms, crochet patterns use several symbols to tell y'all what to practise. Crochet patterns often have a series of steps that are repeated several times across a row. Rather than writing these out time subsequently fourth dimension, asterisks (*) are used to indicate the repeats. A pattern might read like this:
Row iii: Dc in next iii sts; *ch 1, skip next st, dc in adjacent st; rep from * across row (or to end).
That ways that the steps post-obit the asterisk are to be repeated, in guild, until yous achieve the terminate of the row.
Or the pattern might say:
Row three: Dc in next three sts; *ch i, skip adjacent st, dc in next st*, rep from * to * beyond row (or repeat between *'s).
That is just some other way of maxim the same thing, and you work the steps given between the two asterisks, in order, beyond the row.
Now just to make things more complicated — sometimes you volition repeat steps several times within a row, so end up doing something else! That can hateful you will find ** within the *.
Such a pattern might read:
Row 3: Dc in adjacent 3 sts; *ch 1, skip next st, dc in next st,** piece of work a crush in next st; rep from * beyond row, ending concluding rep at **.
Don't throw up your hands in horror! Have it one stride at a time. First, ignore that ** until the pattern tells yous to do something with it. So you will first work the steps post-obit the asterisk across the row, and the last time you volition finish at the **, pregnant you will not work the shell the last time.
Brackets [ ] also are used to tell you how many times to work a certain step. The number immediately post-obit the brackets tells you how many times to do the step.
For example:
Row 7: Dc in adjacent 4 dc, ch i, [sk next dc, crush in adjacent dc] 4 times, ch 1, dc in next 4 dc.
That means you volition work the [sk next dc, beat out in side by side dc] 4 times before going on to work the ch 1, dc in next 4 dc.
Parentheses are sometimes used in the same way.
Parentheses are used to indicate a grouping of stitches that are to exist worked together into a sew, such as: in next dc work (2 dc, ch 3, 2 dc). That ways yous will piece of work all of those stitches in 1 dc, which makes a shell.
Return to peak
Working in Spaces
One instruction that often confuses beginners is " work a vanquish in adjacent ch sp".
A chain space occurs when you lot work a chain sew, then skip a stitch, then piece of work into the next stitch. The space underneath the chain, where you skipped a stitch, is where you lot volition work the shell. Spaces can be one or more than chains, and if they are
3 or more, are often called loops (lps).
Working in the Round
Many crochet projects include working in rounds – such every bit a granny foursquare.
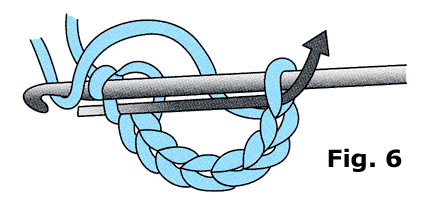
Instructions may read: Ch eight, bring together with a slip sew to form a ring.
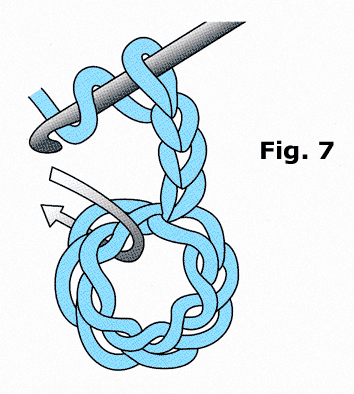
To do this, you volition make a skid knot on the claw as usual, then make 8 chs, then insert the hook into the first chain made, hook the yarn and draw information technology through the outset chain and through the loop on the hook (Meet Figure half dozen). Now you have a pocket-size circle or ring into which y'all will work stitches. To start, you will need to raise the yarn to the correct top with bondage, just every bit you would to outset a row. Figure vii shows working a double crochet sew into the ring. Your design will tell you what to work into the ring.
Forepart or Back Loop
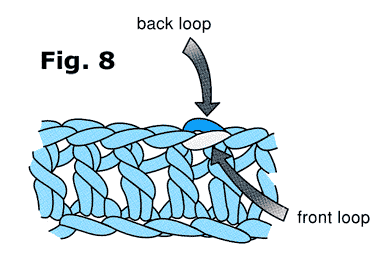
Most crochet stitches are worked under both loops of a stitch. Sometimes a pattern volition tell you to work in the front loop only, or into the back loop only. The front loop is the loop closest to you, the back loop is the loop farthest abroad from you (See Figure 8).
Working Garments
If you are making a garment, y'all need to know some special terms.
Right front, correct sleeve, right shoulder: These all refer to the actual body part on which the slice will exist worn – the right arm, etc. The same applies to left front, left sleeve,left shoulder.
Right side, incorrect side: You may be told to work with the right (or wrong) side of the slice facing you. The right side of a garment is the side that will be seen when it is worn.
Right-hand or Left-hand Corner: You may be asked to bring together yarn in a specific corner. This ways the corner of the piece nearest your correct (or your left) mitt.
At the same time: This is used when you are asked to work two different steps (possibly shaping at the armhole and at the neck) at the aforementioned time.
Work same every bit Left (or Correct) piece, reversing shaping: This can be hard for a beginner. Allow'due south say yous have worked a series of decreases on a left shoulder. Instead of telling you exactly how to practice this for the right shoulder, the pattern may simply tell you to: Piece of work same as left shoulder, reversing shaping. That ways you have to figure out what to exercise! Information technology will be easier if you take pen and newspaper and sketch out what you did the first fourth dimension; then do this in opposite for the other piece.
Special Thanks
Thank you to Jean Leinhauser, ane of the industry's foremost designers/editors and best-selling writer who has worked tirelessly to promote the craft of crochet, for preparing this helpful outline on "How to Read a Crochet Pattern."
And special thanks to Leisure Arts for granting permission to reproduce the diagrams used in this article. The diagrams are taken from Learn to Crochet the Like shooting fish in a barrel Way past Jean Leinhauser.
Return to peak
williamsforneirdis1961.blogspot.com
Source: https://www.craftyarncouncil.com/standards/how-to-read-crochet-pattern
Post a Comment for "Show Wrated Stitch Baby Hat by Mama Instruction"